用nagios监控服务器流量,需要安装net-snmp。可是我这该死的apt源竟然没有这个包。修改了源,还是没有。算了,我还是源码装吧。不喜欢源码装。(当然有喜欢源码装的,我只是比较懒。)
先去net-snmp下载源码包。附地址http://www.net-snmp.org/download.html。我下载的是net-snmp-5.7.3.tar.gz
# tar -zxf net-snmp-5.7.3.tar.gz
# ll
total 9264
drwxr-xr-x 4 root root 4096 Jan 21 02:43 ./
drwxr-xr-x 4 root root 4096 Dec 26 08:17 ../
drwxr-xr-x 15 root root 4096 Dec 26 08:19 nagios-plugins-2.0.3/
-rw-r–r– 1 root root 2659772 Nov 25 09:21 nagios-plugins-2.0.3.tar.gz
drwxrwxr-x 18 1274 1274 4096 Dec 8 20:23 net-snmp-5.7.3/
-rw-r–r– 1 root root 6382428 Jan 20 01:40 net-snmp-5.7.3.tar.gz
-rw-r–r– 1 root root 419695 Dec 5 08:05 nrpe-2.15.tar.gz
# cd net-snmp-5.7.3
安装下依赖包
# apt-get install libsnmp-dev libperl-dev
编译
编译注意参数请注意参数:
–prefix=/usr/local/snmp
选项,选择snmp的安装路径。
–with-mib-modules=ucd-snmp/diskio
选项,可以让服务器支持磁盘I/O监控。
–enable-mfd-rewrites
选项,允许用新的MFD重写mid模块,这样编译的snmp就能支持64位的计数器,能正常采集到流量。
SNMP在安装时需要选择使用的协议版本,包含三个选项:1,2(for 2c)和3。为了安全, 1 版本不能添加snmp监控,所以不推荐使用!其他选项直接跳过就可以啦。
# ./configure --prefix=/usr/local/snmp --with-mib-modules=ucd-snmp/diskio -enable-mfd-rewrites
———————————————————
Net-SNMP configuration summary:
———————————————————
SNMP Versions Supported: 1 2c 3
Building for: linux
Net-SNMP Version: 5.7.3
Network transport support: Callback Unix Alias TCP UDP IPv4Base SocketBase TCPBase UDPIPv4Base UDPBase
SNMPv3 Security Modules: usm
Agent MIB code: default_modules ucd-snmp/diskio => snmpv3mibs mibII ucd_snmp notification notification-log-mib target agent_mibs agentx disman/event disman/schedule utilities host util_funcs/header_simple_table
MYSQL Trap Logging: unavailable
Embedded Perl support: enabled
SNMP Perl modules: building — embeddable
SNMP Python modules: disabled
Crypto support from: crypto
Authentication support: MD5 SHA1
Encryption support: DES AES
Local DNSSEC validation: disabled
———————————————————
#make && make install(此步建议分开执行)
Make install 执行后 配置环境变量
# vim /etc/profile(全局变量) 在最后添加如下信息# vim /etc/environment
export snmp=/usr/local/snmp
export PATH=$PATH:$snmp/bin:$snmp/sbin
(root用户的变量)在引号里面添加# source /etc/profile
:/usr/local/snmp/sbin:/usr/local/snmp/bin(注意有冒号)
修改完后执行
使其环境变量立即生效

现在你可以输入
NET-SNMP version: 5.7.3
Web: http://www.net-snmp.org/
Email: net-snmp-coders@lists.sourceforge.net
出现以上信息说明安装正确,不过这还不够。
添加snmpd.conf snmp.conf
启动snmpd
# snmpd -c /usr/local/snmp/snmpd.conf –d
执行
OK – It is the first time of this plugins to run, or some data file lost. We will get the data from the next time.
出现ok说明执行成功。

你以为这就完了吗?那你就错了。Nagios可是很挑剔的。不信?你瞅
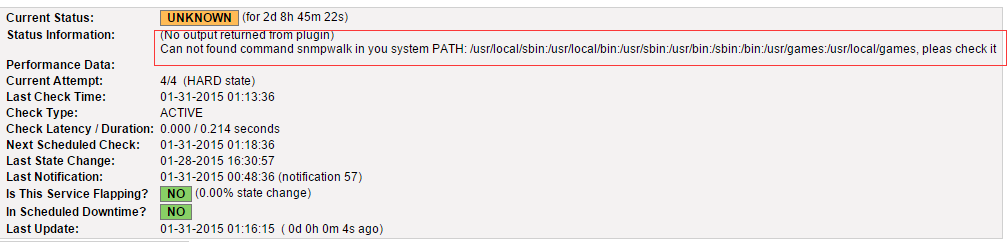
它会告诉你环境路径不对。不能得到插件返回的结果,这让我很蛋疼啊!
解决方法如下
在nagios监控机上执行
# /usr/local/nagios/libexec/check_nrpe -H 被监控机IP -c check_traffic
![]()
它告诉我在后面那些PATH中找不到snmpwalk这个命令,操!你他妈为什么不从环境变量里找啊,非挑这么几个。没办法还是认了吧
在监控机上执行
# find / -name snmpwalk
/usr/local/snmp/bin/snmpwalk
然后把snmpwalk copy到/usr/local/sbin
然后再到nagios监控机上执行
![]()
尼玛啊!
继续查找snmpget copy到/usr/local/sbin
# find / -name snmpget
# cp /usr/local/snmp/bin/snmpget /usr/local/sbin/

再到nagios监控机上执行

# /usr/local/nagios/libexec/check_nrpe -H被监控机IP -c check_traffic

CHECK_NRPE: Socket timeout after 10 seconds.

。。。。。。我可以大声的骂人吗?

找问题,去排除问题。到被监控机上执行

# ps -ef | grep nrpe

nagios 60779 1 0 Jan28 ? 00:00:01 /usr/local/nagios/bin/nrpe -c /usr/local/nagios/etc/nrpe.cfg -d

nagios 61589 1 0 01:30 ? 00:00:00 /usr/local/nagios/bin/nrpe -c /usr/local/nagios/etc/nrpe.cfg -d

nagios 61590 61589 0 01:30 ? 00:00:00 /usr/local/nagios/bin/nrpe -c /usr/local/nagios/etc/nrpe.cfg -d

root 61663 19955 0 01:30 pts/0 00:00:00 grep --color=auto nrpe

发现有多余的进程。不管了全部kill掉。

再启动nrpe

# /usr/local/nagios/bin/nrpe -c /usr/local/nagios/etc/nrpe.cfg –d

顺便把这个也重启了

# service xinetd restart

xinetd stop/waiting

xinetd start/running, process 61697

再跑到nagios监控机执行

# /usr/local/nagios/libexec/check_nrpe -H wangdl-vm-001.chinacloudapp.cn -c check_traffic

Unknown - Read or Write File /var/tmp/check_traffic_localhost_2__itnms.hist_dat_64 Error with user uid=1001(nagios) gid=1001(nagios) groups=1001(nagios).

我!操!你!妈!能不能一次把问题说完啊。大哥!

遇见这个问题,在被监控机上执行

# chmod 666 /var/tmp/check_traffic_localhost_2__itnms.hist_dat_*

再跑到nagios监控机上执行

# /usr/local/nagios/libexec/check_nrpe -H wangdl-vm-001.chinacloudapp.cn -c check_traffic

OK - The Traffic In is 0.0Mbps, Out is 0.0Mbps, Total is 0.0Mbps. The Check Interval is 483s |In=0.0Mbps;12;15;0;0 Out=0.0Mbps;30;35;0;0 Total=0.0Mbps;42;50;0;0 Interval=483s;1200;1800;0;0

想哭啊!真不容易啊!

也快结束了。

记得把snmpd添加到开机自启动里

echo "snmpd -c /usr/local/snmp/snmpd.conf -d" >> /etc/rc.local

ps:我那个snmp.conf和snmpd.conf几乎没有怎么配置我添加附件。有需要的可以下载使用。肯定好使,但是用的public对于某些比较严格的,可能是不行的。不过可以自己改的。
http://pan.baidu.com/s/1gdd7Abp
———————————————————————-下面是snmp配置文件的生成办法。仅供参考—————————————————————————————-
复制EXAMPLE.conf 到net-snmp安装目录并更名为snmpd.conf
# cp EXAMPLE.conf /usr/local/net-snmp/snmpd.conf
使用snmpconf命令生成snmp.conf配置文件
# snmpconf
The program ‘snmpconf’ is currently not installed. You can install it by typing:
apt-get install snmp
#apt-get install snmp
继续执行
# snmpconf
The following installed configuration files were found:
1: /etc/snmp/snmp.conf
Would you like me to read them in? Their content will be merged with the
output files created by this session.
Valid answer examples: “all”, “none”,”3″,”1,2,5″
Read in which (default = all): none
I can create the following types of configuration files for you.
Select the file type you wish to create:
(you can create more than one as you run this program)
1: snmp.conf
Other options: quit
Select File: 3
invalid selection: 3 [must be 1-1]
Select File: 1
The configuration information which can be put into snmp.conf is divided
into sections. Select a configuration section for snmp.conf
that you wish to create:
1: Debugging output options
2: Output style options
3: Textual mib parsing
4: Default Authentication Options
Other options: finished
Select section: 4
Section: Default Authentication Options
Description:
This section defines the default authentication
information. Setting these up properly in your
~/.snmp/snmp.conf file will greatly reduce the amount of
command line arguments you need to type (especially for snmpv3).
Select from:
1: The default port number to use
2: The default snmp version number to use.
3: The default snmpv1 and snmpv2c community name to use when needed.
4: The default snmpv3 security name to use when using snmpv3
5: The default snmpv3 context name to use
6: The default snmpv3 security level to use
7: The default snmpv3 authentication type name to use
8: The default snmpv3 authentication pass phrase to use
9: The default snmpv3 privacy (encryption) type name to use
10: The default snmpv3 privacy pass phrase to use
Other options: finished, list
Select section: 1
Configuring: defaultport
Description:
The default port number to use
This token specifies the default port number you want packets to
be sent to and received from.
override: with -p on the command line.
arguments: portnum
Enter the default port number to use: 161
Finished Output: defaultport 161
Section: Default Authentication Options
Description:
This section defines the default authentication
information. Setting these up properly in your
~/.snmp/snmp.conf file will greatly reduce the amount of
command line arguments you need to type (especially for snmpv3).
Select from:
1: The default port number to use
2: The default snmp version number to use.
3: The default snmpv1 and snmpv2c community name to use when needed.
4: The default snmpv3 security name to use when using snmpv3
5: The default snmpv3 context name to use
6: The default snmpv3 security level to use
7: The default snmpv3 authentication type name to use
8: The default snmpv3 authentication pass phrase to use
9: The default snmpv3 privacy (encryption) type name to use
10: The default snmpv3 privacy pass phrase to use
Other options: finished, list
Select section: 2
Configuring: defversion
Description:
The default snmp version number to use.
override: with -v on the command line.
arguments: 1|2c|3
Enter the default snmp version number to use (1|2c|3): 2c
Finished Output: defversion 2c
Section: Default Authentication Options
Description:
This section defines the default authentication
information. Setting these up properly in your
~/.snmp/snmp.conf file will greatly reduce the amount of
command line arguments you need to type (especially for snmpv3).
Select from:
1: The default port number to use
2: The default snmp version number to use.
3: The default snmpv1 and snmpv2c community name to use when needed.
4: The default snmpv3 security name to use when using snmpv3
5: The default snmpv3 context name to use
6: The default snmpv3 security level to use
7: The default snmpv3 authentication type name to use
8: The default snmpv3 authentication pass phrase to use
9: The default snmpv3 privacy (encryption) type name to use
10: The default snmpv3 privacy pass phrase to use
Other options: finished, list
Select section: 3
Configuring: defcommunity
Description:
The default snmpv1 and snmpv2c community name to use when needed.
If this is specified, you don’t need to include the community
name as an argument to the snmp applications.
override: with -c on the command line.
arguments: communityname
Enter the default community name to use: public
Finished Output: defcommunity public
Section: Default Authentication Options
Description:
This section defines the default authentication
information. Setting these up properly in your
~/.snmp/snmp.conf file will greatly reduce the amount of
command line arguments you need to type (especially for snmpv3).
Select from:
1: The default port number to use
2: The default snmp version number to use.
3: The default snmpv1 and snmpv2c community name to use when needed.
4: The default snmpv3 security name to use when using snmpv3
5: The default snmpv3 context name to use
6: The default snmpv3 security level to use
7: The default snmpv3 authentication type name to use
8: The default snmpv3 authentication pass phrase to use
9: The default snmpv3 privacy (encryption) type name to use
10: The default snmpv3 privacy pass phrase to use
Other options: finished, list
Select section: finished
The configuration information which can be put into snmp.conf is divided
into sections. Select a configuration section for snmp.conf
that you wish to create:
1: Debugging output options
2: Output style options
3: Textual mib parsing
4: Default Authentication Options
Other options: finished
Select section: finished
I can create the following types of configuration files for you.
Select the file type you wish to create:
(you can create more than one as you run this program)
1: snmp.conf
Other options: quit
Select File: quit
The following files were created:
snmp.conf
These files should be moved to /usr/share/snmp if you
want them used by everyone on the system. In the future, if you add
the -i option to the command line I’ll copy them there automatically for you.
Or, if you want them for your personal use only, copy them to
/root/.snmp . In the future, if you add the -p option to the
command line I’ll copy them there automatically for you.
复制此配置文件到安装目录
# cp snmp.conf /usr/local/net-snmp/